These thick concrete paving slabs are typically used by city councils due to their durability and strength under high traffic. Council paving slabs often give you an extremely durable solution and also come at an affordable price due to their bulk purchasing by regional councils around the UK. Council paving slabs are solid concrete and will provide you with a long-lasting paving surface, especially suited for high traffic and adverse weather conditions.
Imperial size 3 x 2 ft x 2 inches approximately
Commercial paving is ideally suited to areas that are subject to heavy footfall. We supply products ranging from council paving slabs for pavements to Tactile paving to aid the visually impaired.
To work out how many slabs and aggregate you'll need to lay them on we recommend this handy calculator.
Guide to Laying 3x2 Council Paving Slabs (71kg)
Laying heavy 3x2 council paving slabs can be a rewarding project for both DIY enthusiasts and professionals. These slabs, weighing around 71kg each, require careful planning, proper tools, and assistance due to their weight. This guide will walk you through the steps to ensure a professional finish while keeping safety in mind.
Materials and Tools You’ll Need:
3x2 Council Paving Slabs
MOT Type 1 Sub-base
Sharp sand and cement (for the mortar mix)
Spirit level
Rubber mallet
Shovel, rake, and wheelbarrow
Plate compactor (if available)
Wooden pegs and string
Trowel
Pointing tool
Lifting equipment (such as a slab lifter) or assistance from another person
Hose or water sprayer
Step 1: Prepare the Area
1.1. Clear the Area:
Remove all plants, grass, and debris from the area where the slabs will be laid.
Measure and mark the boundaries using pegs and string, ensuring the area is slightly larger than the planned slab layout.
1.2. Dig Out the Base:
Dig out the ground to a depth of 150–200 mm (6–8 inches). This allows enough space for both the sub-base and the mortar bed.
Ensure that the area has a slight fall (slope) of around 1:80 away from buildings to aid water drainage.
Step 2: Lay the Sub-base
2.1. Spread MOT Type 1:
Lay a 100–150 mm layer of MOT Type 1 sub-base in the dug-out area. This material improves drainage and provides a solid foundation for the paving slabs.
Rake the sub-base to create an even surface, then use a plate compactor to compact it firmly. A solid, well-compacted base prevents your slabs from sinking over time.
Step 3: Mix the Mortar
3.1. Prepare the Mortar:
Mix your mortar using a ratio of 3 parts sharp sandto 1 part cement. Add water gradually to achieve a semi-dry consistency. The mix should be wet enough to bind but not too sloppy.
Use a wheelbarrow or mortar mixing tray to combine the materials evenly.
Step 4: Lay the First Slab
4.1. Apply the Mortar Bed:
Spread a 30–40 mm thick layer of mortar over the compacted sub-base where you plan to lay the first slab. Ensure the bed is slightly higher than the final position of the slab.
4.2. Position the Slab:
With the help of lifting equipment or a second person, carefully lower the first 3x2 slab onto the mortar bed. Aim to position it as close to the desired spot as possible.
4.3. Level the Slab:
Gently tap the slab using a rubber mallet to embed it about 15 mm into the mortar. Use a spirit level to check the slab is flat, adjusting as needed to maintain the slight slope for drainage.
Step 5: Lay the Remaining Slabs
5.1. Leave Gaps:
As you continue laying the slabs, leave a 10 mm gap between each one for expansion and to allow for pointing.
To keep the spacing uniform, you can use spacers or a piece of timber cut to size.
5.2. Check for Level:
After placing each slab, check it against the previous one using a spirit level. Make adjustments by adding or removing small amounts of mortar to ensure all slabs are level with one another and maintain the proper drainage slope.
Step 6: Let the Mortar Set
6.1. Spray the Slabs:
After all the slabs are laid, lightly spray the entire patio with water to help the mortar set. Do not drench the area, just enough to moisten the mortar without causing puddles.
6.2. Let it Set:
Leave the slabs undisturbed for at least 24 hours to allow the mortar to harden fully before proceeding to the next step.
Step 7: Fill the Joints
7.1. Pointing the Joints:
After the slabs have set, use a mix of 4 parts sharp sand to 1 part cement to create a pointing mortar. The mix should be slightly wetter than the bedding mortar.
Using a trowel and pointing tool, carefully fill the gaps between the slabs, pressing the mortar down firmly. Take care not to stain the surface of the slabs with mortar.
7.2. Finishing Touches:
Use a pointing tool to smooth the joints, ensuring a neat finish. Let the pointing mortar dry for 24 hours before using the patio.
Safety Tips:
Heavy lifting: Always lift with your legs, not your back, to avoid injury. Consider using lifting aids such as slab lifters or asking for help from others.
Wear appropriate protective gear: Gloves, knee pads, and safety boots with steel toecaps will protect you during the project.
Laying 3x2 council paving slabs can transform your outdoor space or walkway, creating a durable paved area. With careful preparation and proper technique, you can achieve a professional finish that will last for years. Whether you're a DIY enthusiast or a professional builder, following these steps ensures a strong, level surface ready for any weather.
Arranstone
Paving
{PRODUCT_DESCRIPTION}
Delivery is free to Mainland England and Wales. Deliveries are chargable to Scotland.
Once the order is placed, our courier will call you within 3 working days to arrange a delivery date. If you do not hear from the courier within 3 days, please get in touch with us. The majority of deliveries are made within 7 days, occasionally a little longer during peak periods.
Deliveries are made between 08:00 and 18:00 on the day, we request the driver calls you one hour before with an advised time.
Delivery is made via a kerbside tail lift lorry, we cannot deliver to sloping ground as the tail lift must be able to lay flat.
The road must be wide enough for a lorry to fit down and free from obstruction, if there are any access restrictions, please contact us.
Deliveries must be signed for, please report any damages to us within 24 hours.
We offer all bricks with a tail lift offloading service, Please familiarise yourself with the information below.
Crane offloading is available as a premium service for some bricks.
FAQ
All of our C16 and C24 graded timber is regularised
Regularised timber is timber that has been processed to have a uniform shape and size. This means that the wood has been sawn and planed to remove any irregularities and ensure that each piece of wood has consistent dimensions. Regularised timber is often used in construction, particularly in the framing of buildings, as it is easier to work with and can be more efficiently installed than irregularly shaped timber.
We have one of the largest ranges of timber lengths, dimensions and grades available to buy online.
The variation you require will determine the exact lead time and delivery method.
Most orders arrive within 3-4 days, the maximum is 7 days. Please get in touch before you order if you need a specifc delivery date.
Delivery charges vary by postcode. To find out the delivery charge, add the item(s) you require to your basket and select CALCULATE SHIPPING at the bottom of the page.
Some orders are delivered on our own vehicles based in Leicestershire and Cheshire. We also use carriers including Yodel and Tuffnells. For some sizes and locations we use regional distributors.
If you'd prefer crane offloading rather than tail lift vehicle offloading for your brick order then this service is available for the majority of bricks that we sell. Charges are shown at checkout.
For deliveries of less than 6 packs then Taillift offloading is normally a more cost effective option
Downloadable information can be found here:
Armstrong Cheshire supply the full range of Catnic Lintels. If you don't see the lintel you need on our website, choose from the Catnic Lintel Selector Brochure and give us a call 01625 322269
Downloadable information can be found here:
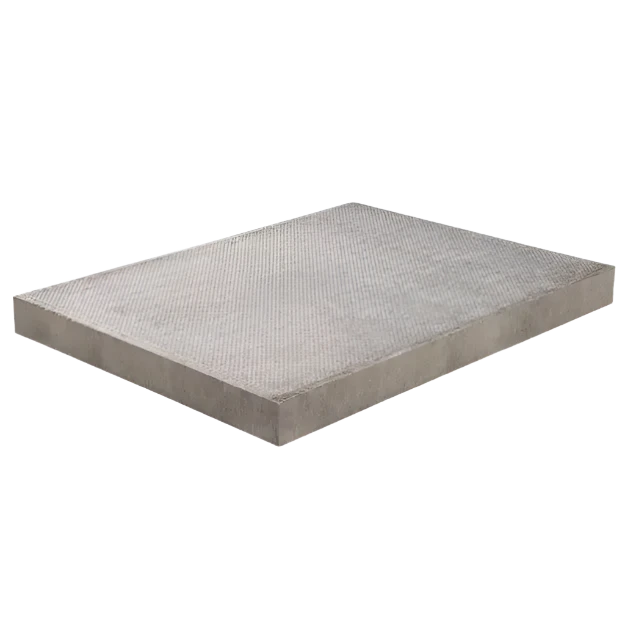
Council Paving Slabs 900x600x50mm (3 x 2 ft)
These thick concrete paving slabs are typically used by city councils due to their durability and strength under high traffic. Council paving slabs often give you an extremely durable solution and also come at an affordable price due to their bulk purchasing by regional councils around the UK. Council paving slabs are solid concrete and will provide you with a long-lasting paving surface, especially suited for high traffic and adverse weather conditions.
Imperial size 3 x 2 ft x 2 inches approximately
Commercial paving is ideally suited to areas that are subject to heavy footfall. We supply products ranging from council paving slabs for pavements to Tactile paving to aid the visually impaired.
To work out how many slabs and aggregate you'll need to lay them on we recommend this handy calculator.
Guide to Laying 3x2 Council Paving Slabs (71kg)
Laying heavy 3x2 council paving slabs can be a rewarding project for both DIY enthusiasts and professionals. These slabs, weighing around 71kg each, require careful planning, proper tools, and assistance due to their weight. This guide will walk you through the steps to ensure a professional finish while keeping safety in mind.
Materials and Tools You’ll Need:
3x2 Council Paving Slabs
MOT Type 1 Sub-base
Sharp sand and cement (for the mortar mix)
Spirit level
Rubber mallet
Shovel, rake, and wheelbarrow
Plate compactor (if available)
Wooden pegs and string
Trowel
Pointing tool
Lifting equipment (such as a slab lifter) or assistance from another person
Hose or water sprayer
Step 1: Prepare the Area
1.1. Clear the Area:
Remove all plants, grass, and debris from the area where the slabs will be laid.
Measure and mark the boundaries using pegs and string, ensuring the area is slightly larger than the planned slab layout.
1.2. Dig Out the Base:
Dig out the ground to a depth of 150–200 mm (6–8 inches). This allows enough space for both the sub-base and the mortar bed.
Ensure that the area has a slight fall (slope) of around 1:80 away from buildings to aid water drainage.
Step 2: Lay the Sub-base
2.1. Spread MOT Type 1:
Lay a 100–150 mm layer of MOT Type 1 sub-base in the dug-out area. This material improves drainage and provides a solid foundation for the paving slabs.
Rake the sub-base to create an even surface, then use a plate compactor to compact it firmly. A solid, well-compacted base prevents your slabs from sinking over time.
Step 3: Mix the Mortar
3.1. Prepare the Mortar:
Mix your mortar using a ratio of 3 parts sharp sandto 1 part cement. Add water gradually to achieve a semi-dry consistency. The mix should be wet enough to bind but not too sloppy.
Use a wheelbarrow or mortar mixing tray to combine the materials evenly.
Step 4: Lay the First Slab
4.1. Apply the Mortar Bed:
Spread a 30–40 mm thick layer of mortar over the compacted sub-base where you plan to lay the first slab. Ensure the bed is slightly higher than the final position of the slab.
4.2. Position the Slab:
With the help of lifting equipment or a second person, carefully lower the first 3x2 slab onto the mortar bed. Aim to position it as close to the desired spot as possible.
4.3. Level the Slab:
Gently tap the slab using a rubber mallet to embed it about 15 mm into the mortar. Use a spirit level to check the slab is flat, adjusting as needed to maintain the slight slope for drainage.
Step 5: Lay the Remaining Slabs
5.1. Leave Gaps:
As you continue laying the slabs, leave a 10 mm gap between each one for expansion and to allow for pointing.
To keep the spacing uniform, you can use spacers or a piece of timber cut to size.
5.2. Check for Level:
After placing each slab, check it against the previous one using a spirit level. Make adjustments by adding or removing small amounts of mortar to ensure all slabs are level with one another and maintain the proper drainage slope.
Step 6: Let the Mortar Set
6.1. Spray the Slabs:
After all the slabs are laid, lightly spray the entire patio with water to help the mortar set. Do not drench the area, just enough to moisten the mortar without causing puddles.
6.2. Let it Set:
Leave the slabs undisturbed for at least 24 hours to allow the mortar to harden fully before proceeding to the next step.
Step 7: Fill the Joints
7.1. Pointing the Joints:
After the slabs have set, use a mix of 4 parts sharp sand to 1 part cement to create a pointing mortar. The mix should be slightly wetter than the bedding mortar.
Using a trowel and pointing tool, carefully fill the gaps between the slabs, pressing the mortar down firmly. Take care not to stain the surface of the slabs with mortar.
7.2. Finishing Touches:
Use a pointing tool to smooth the joints, ensuring a neat finish. Let the pointing mortar dry for 24 hours before using the patio.
Safety Tips:
Heavy lifting: Always lift with your legs, not your back, to avoid injury. Consider using lifting aids such as slab lifters or asking for help from others.
Wear appropriate protective gear: Gloves, knee pads, and safety boots with steel toecaps will protect you during the project.
Laying 3x2 council paving slabs can transform your outdoor space or walkway, creating a durable paved area. With careful preparation and proper technique, you can achieve a professional finish that will last for years. Whether you're a DIY enthusiast or a professional builder, following these steps ensures a strong, level surface ready for any weather.
Arranstone
Paving
{PRODUCT_DESCRIPTION}
Delivery is free to Mainland England and Wales. Deliveries are chargable to Scotland.
Once the order is placed, our courier will call you within 3 working days to arrange a delivery date. If you do not hear from the courier within 3 days, please get in touch with us. The majority of deliveries are made within 7 days, occasionally a little longer during peak periods.
Deliveries are made between 08:00 and 18:00 on the day, we request the driver calls you one hour before with an advised time.
Delivery is made via a kerbside tail lift lorry, we cannot deliver to sloping ground as the tail lift must be able to lay flat.
The road must be wide enough for a lorry to fit down and free from obstruction, if there are any access restrictions, please contact us.
Deliveries must be signed for, please report any damages to us within 24 hours.
We offer all bricks with a tail lift offloading service, Please familiarise yourself with the information below.
Crane offloading is available as a premium service for some bricks.
All of our C16 and C24 graded timber is regularised
Regularised timber is timber that has been processed to have a uniform shape and size. This means that the wood has been sawn and planed to remove any irregularities and ensure that each piece of wood has consistent dimensions. Regularised timber is often used in construction, particularly in the framing of buildings, as it is easier to work with and can be more efficiently installed than irregularly shaped timber.
We have one of the largest ranges of timber lengths, dimensions and grades available to buy online. The variation you require will determine the exact lead time and delivery method.
Most orders arrive within 3-4 days, the maximum is 7 days.
Please get in touch before you order if you need a specific delivery date.
Delivery charges vary by postcode. To find out the delivery charge, add the item(s) you require to your basket and select CALCULATE SHIPPING at the bottom of the page. Some orders are delivered on our vehicles based in Leicestershire and Cheshire. We also use carriers including Yodel and Tuffnells. For some sizes and locations, we use regional distributors.
If you'd prefer crane offloading rather than tail lift vehicle offloading for your brick order then this service is available for the majority of bricks that we sell. Charges are shown at checkout.
For deliveries of less than 6 packs then Taillift offloading is normally a more cost effective option
Downloadable information can be found here:
Armstrong Cheshire supply the full range of Catnic Lintels. If you don't see the lintel you need on our website, choose from the Catnic Lintel Selector Brochure and give us a call 01625 322269
Council Paving Slabs 900x600x50mm (3x2 ft) BSS Pressed Concrete
£15.85
Unit price /
Unavailable
3x2 council paving slabs made of pressed concrete. Durable, weather-resistant, and ideal for high-traffic outdoor areas. Order online for fast UK delivery.
Council Paving Slabs 900x600x50mm (3x2 ft) BSS Pressed Concrete
is backordered and will ship as soon as it is back in stock.
Couldn't load collection availability
Delivery charges will vary depending on your location.
To find out delivery cost to your postcode, add the products your require to your basket and then review your basket, entering the delivery postcode
We look to dispatch all products same-day where possible, we use a close network of couriers we have worked alongside for a number of years and will share any and all shipping updates with you directly.
Council Paving Slabs 900x600x50mm (3 x 2 ft)
These thick concrete paving slabs are typically used by city councils due to their durability and strength under high traffic. Council paving slabs often give you an extremely durable solution and also come at an affordable price due to their bulk purchasing by regional councils around the UK. Council paving slabs are solid concrete and will provide you with a long-lasting paving surface, especially suited for high traffic and adverse weather conditions.
Imperial size 3 x 2 ft x 2 inches approximately
Commercial paving is ideally suited to areas that are subject to heavy footfall. We supply products ranging from council paving slabs for pavements to Tactile paving to aid the visually impaired.
To work out how many slabs and aggregate you'll need to lay them on we recommend this handy calculator.
Guide to Laying 3x2 Council Paving Slabs (71kg)
Laying heavy 3x2 council paving slabs can be a rewarding project for both DIY enthusiasts and professionals. These slabs, weighing around 71kg each, require careful planning, proper tools, and assistance due to their weight. This guide will walk you through the steps to ensure a professional finish while keeping safety in mind.
Materials and Tools You’ll Need:
3x2 Council Paving Slabs
MOT Type 1 Sub-base
Sharp sand and cement (for the mortar mix)
Spirit level
Rubber mallet
Shovel, rake, and wheelbarrow
Plate compactor (if available)
Wooden pegs and string
Trowel
Pointing tool
Lifting equipment (such as a slab lifter) or assistance from another person
Hose or water sprayer
Step 1: Prepare the Area
1.1. Clear the Area:
Remove all plants, grass, and debris from the area where the slabs will be laid.
Measure and mark the boundaries using pegs and string, ensuring the area is slightly larger than the planned slab layout.
1.2. Dig Out the Base:
Dig out the ground to a depth of 150–200 mm (6–8 inches). This allows enough space for both the sub-base and the mortar bed.
Ensure that the area has a slight fall (slope) of around 1:80 away from buildings to aid water drainage.
Step 2: Lay the Sub-base
2.1. Spread MOT Type 1:
Lay a 100–150 mm layer of MOT Type 1 sub-base in the dug-out area. This material improves drainage and provides a solid foundation for the paving slabs.
Rake the sub-base to create an even surface, then use a plate compactor to compact it firmly. A solid, well-compacted base prevents your slabs from sinking over time.
Step 3: Mix the Mortar
3.1. Prepare the Mortar:
Mix your mortar using a ratio of 3 parts sharp sandto 1 part cement. Add water gradually to achieve a semi-dry consistency. The mix should be wet enough to bind but not too sloppy.
Use a wheelbarrow or mortar mixing tray to combine the materials evenly.
Step 4: Lay the First Slab
4.1. Apply the Mortar Bed:
Spread a 30–40 mm thick layer of mortar over the compacted sub-base where you plan to lay the first slab. Ensure the bed is slightly higher than the final position of the slab.
4.2. Position the Slab:
With the help of lifting equipment or a second person, carefully lower the first 3x2 slab onto the mortar bed. Aim to position it as close to the desired spot as possible.
4.3. Level the Slab:
Gently tap the slab using a rubber mallet to embed it about 15 mm into the mortar. Use a spirit level to check the slab is flat, adjusting as needed to maintain the slight slope for drainage.
Step 5: Lay the Remaining Slabs
5.1. Leave Gaps:
As you continue laying the slabs, leave a 10 mm gap between each one for expansion and to allow for pointing.
To keep the spacing uniform, you can use spacers or a piece of timber cut to size.
5.2. Check for Level:
After placing each slab, check it against the previous one using a spirit level. Make adjustments by adding or removing small amounts of mortar to ensure all slabs are level with one another and maintain the proper drainage slope.
Step 6: Let the Mortar Set
6.1. Spray the Slabs:
After all the slabs are laid, lightly spray the entire patio with water to help the mortar set. Do not drench the area, just enough to moisten the mortar without causing puddles.
6.2. Let it Set:
Leave the slabs undisturbed for at least 24 hours to allow the mortar to harden fully before proceeding to the next step.
Step 7: Fill the Joints
7.1. Pointing the Joints:
After the slabs have set, use a mix of 4 parts sharp sand to 1 part cement to create a pointing mortar. The mix should be slightly wetter than the bedding mortar.
Using a trowel and pointing tool, carefully fill the gaps between the slabs, pressing the mortar down firmly. Take care not to stain the surface of the slabs with mortar.
7.2. Finishing Touches:
Use a pointing tool to smooth the joints, ensuring a neat finish. Let the pointing mortar dry for 24 hours before using the patio.
Safety Tips:
Heavy lifting: Always lift with your legs, not your back, to avoid injury. Consider using lifting aids such as slab lifters or asking for help from others.
Wear appropriate protective gear: Gloves, knee pads, and safety boots with steel toecaps will protect you during the project.
Laying 3x2 council paving slabs can transform your outdoor space or walkway, creating a durable paved area. With careful preparation and proper technique, you can achieve a professional finish that will last for years. Whether you're a DIY enthusiast or a professional builder, following these steps ensures a strong, level surface ready for any weather.
Council Paving Slabs 900x600x50mm (3x2 ft) BSS Pressed Concrete
These council paving slabs are trusted by city councils across the UK for their exceptional durability and affordability. Designed to withstand heavy footfall and adverse weather, they are perfect for high-traffic areas such as pavements, public pathways, and commercial projects.
Crafted from solid concrete, these 900x600x50mm slabs (3x2 ft) offer unparalleled strength, ensuring long-lasting performance in both residential and commercial spaces.
Perfect for High-Traffic and Adverse Conditions
The thick 50mm depth of these slabs makes them ideal for use in areas with heavy foot traffic or challenging weather conditions. Their pressed concrete design adds extra strength while maintaining an even surface that looks great and performs reliably.
How to Lay 3x2 Council Paving Slabs
Whether you're a DIY enthusiast or a professional, laying these 71kg slabs requires the right tools and preparation. Use our step-by-step guide to ensure a level and secure finish. Start with a compacted MOT Type 1 sub-base, apply a mortar mix of sharp sand and cement, and carefully position the slabs to achieve the perfect layout.
Applications of Council Paving Slabs
These versatile paving slabs are suitable for various applications:
Public pavements
Garden walkways
Outdoor commercial areas
Shed bases
Their simple yet durable design makes them a reliable choice for any outdoor project.
Transform Your Outdoor Space with Affordable Durability
At Armstrong Cheshire, we provide premium-quality council paving slabs at competitive prices. Order online for fast delivery and create a durable, professional-grade paved area for any application.
Have a question?
If you have any questions about our products or would like to learn more about our shipping options please feel free to contact one of our team today.